AUTO PRICING FOR
DUMMIES
No, we do
not consider you a dummy. You are auto pricing deficient. The first step to
help is to realize your weaknesses and approach them with an open mind and love
in your heart. Ok, forget the love in your heart part. We just request that you
take for your consideration all aspects of auto pricing to better serve your
customers and promote a consistent and healthy profit model. This overview is
intended to help you accomplish that goal.
Before we
get into different scenarios for auto pricing lets first break down each
element within auto pricing. Each component plays an integral part in the
complex matrix that makes up auto pricing. The structure in which auto pricing
(from here on out referenced as APX) is derived can best be described as a
reverse pyramid. It trickles up from the bottom to the top. Pricing is first
calculated at the Item level, then the vendor/group level and finally at the
header level. However, when setting up APX we must first create the header.
This is where you will create your matrix. Remember APX is about giving a break
on some things and making up for it on others, after all we are in this
business to make money, but you didn’t hear that from me. So take the Red pill
and enter the Matrix and let’s get started breaking this beast down. Instead of setting something up
and doing this 
Header level elements: first off, the name of your APX. Very
important to label your APX so other users can readily understand it. Since APX
is Account driven you should encompass the account name within the APX name
when possible. If across multiple accounts then something derived from the
matrix type. Just keep it simple.
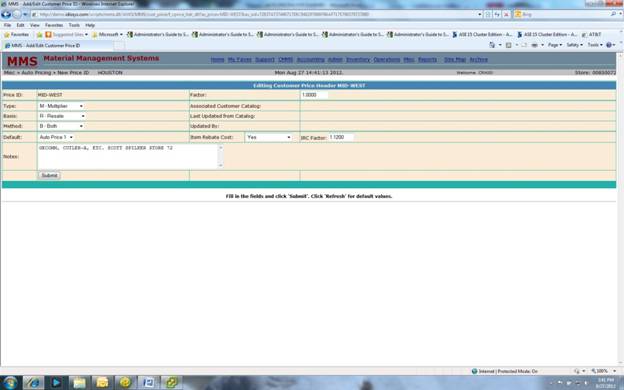
The next four
elements are very important and work in conjunction with each other, Type, Basis, Method, and Factor. This
is the meat of the matrix. Let’s first consider the Method. The Method
determines the level at which the Type and Basis will be applied. They are
fairly self explanatory, but we will go over the options for our Lake Chuck
Users just in case. The Method of
‘ALL’ is just that, all items are considered at the header pricing level. There
is no item or vendor level pricing. ‘Vendor’, pricing at the IMS Vendor/Group
level. This can be across multiple vendors and groups. ‘ITEM’, pricing at the
Store Product Code level, commonly used for net pricing were the price is set
for a specific period of time. And of course ‘BOTH’, the best of both worlds.
This pricing method includes Vendor/group and item pricing.
Ok, we got a
Method now what? Basis, we need a
base price to consider in our calculation. What value are we going to use. This
can be determined by a contract with the Customer based on Cost of the material
or some other methodology. Valid options are ‘RESALE’ (Group Resale Price),
‘COST’ (Store Replacement Cost, if not available then Group Replacement Cost),
‘TRADE COST’ (Trade Service Cost), ‘TRADE RESALE’ (Trade Service Resale Price),
‘LIST PRICE’ (Group List Price, updated from Trade Service), or **‘NET COST’.
At this
point Type and Factor come into
play. The ‘Type’ determines how the math is applied. ‘Discount’ of course would
calculate a discounted amount and subtract that amount from the base amount to
derive the price. ‘Multiplier’ (not to be confused with the Keynesian
Multiplier Effect), calculate an amount of increase based on a multiplier, most
commonly used for arriving at a set margin of return.
Ok, back
from a three martini lunch, time to re-focus.

Seemingly
this should be enough, but how do you handle items that fall outside of this
matrix? Enter the ‘Default’ option.
This option only comes into play when the Method is either vendor, Item, or
Both. Set this value to handle items not covered in the matrix. Viable
selections are ‘Header, Auto Price1, Auto Price2, and Group Resale Price.
Again, the Factor will apply to these options. If the Header is selected then
items outside the detail matrix would calculate out as Basis/Type/Factor. Simple,
simple, simple. Oh wait, caveats.
Caveats: a modifying or cautionary
detail to be considered when evaluating, interpreting, or doing something. **Net Cost option at the Basis. This one
is really easy; just throw out all the previous information and set the Basis
to Net Cost and enter a Factor. Done. What this does is set all pricing off of
Net Cost (Rebated or Replacement). All other settings are disregarded,
including Default. This option is Account driven so the only other concern is
setting up Account(s). Vendor and Item functions are disabled for this setting.
***Net Cost at the Item Level. This is a
new enhancement to APX. Setting this value to ‘Yes’ with a IRC Factor will
calculate all Rebated Items out and handle all non rebated items through the
matrix.  I
know, sweet justice. Let’s go over this option one more time. You can price just
the rebated items by the calculated rebate cost against the IRC Factor. All
other items will be priced by the APX including the Default setting. This gives
you the flexibility to truly custom fit your APX. One thing to remember about
Net Cost at the Basis level. The Net Cost represents the lesser value between
the calculated Rebate Cost and the item Replacement Cost. So the IRC Factor
will be used against the lower value to calculate the Price.
I
know, sweet justice. Let’s go over this option one more time. You can price just
the rebated items by the calculated rebate cost against the IRC Factor. All
other items will be priced by the APX including the Default setting. This gives
you the flexibility to truly custom fit your APX. One thing to remember about
Net Cost at the Basis level. The Net Cost represents the lesser value between
the calculated Rebate Cost and the item Replacement Cost. So the IRC Factor
will be used against the lower value to calculate the Price.
Now let’s turn our attention to APX
Item level functions, Item, Vendor, and Account.
The APX is Customer specific in most
cases. Entering an Account number at this level serves as a connecting link to
the APX. Multiple accounts can be tied to a single APX or multiple APX’s
can be tied to a single account (in this case the lowest rebated cost will be used). If need be create another account to handle
any other situation. Once the Account is submitted here
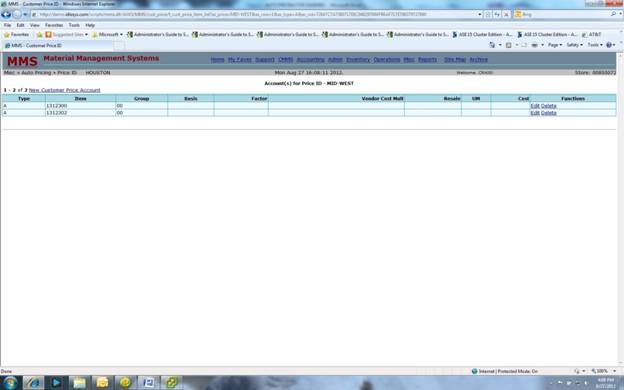
it will be priced per the APX so make
sure your matrix is setup properly. And whatever you do never shoot pool
against this guy.

Okay,
we have had our fun and games, now let’s get serious. Have a few more drinks,
you can take him. Just keep doubling the bet; you’re bound to get even. And if
not I’m sure he has a payment plan.
APX at the Vendor/Group level:
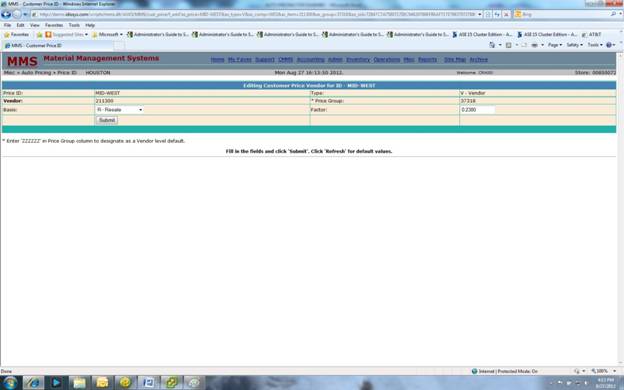
This function needs to be submitted
with the associated IMS Vendors when the APX Basis is set to Vendor or Both.
Product Codes tied to the vendor(s) will be priced out based on the Vendor
level matrix. Just like the header level set the Basis and Factor. This will
override the header Basis and Factor for selected Vendors. The Price Group
option allows you to customize a matrix per a specific *Price Group. Setting
the Price Group to ‘ZZZZZZ’ will handle all Price Groups not listed for the
Vendor.
APX at the Item Level:
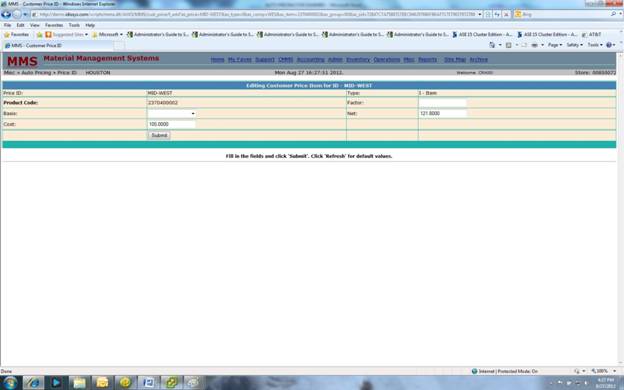
This oddly enough is the first level
considered when the APX Method is set to Item or Both. Items contained here
will override all other settings even the Net Cost options. Enter a valid
Product Code from the Group catalog. If a Net Item with a set price enter that
value in the Net column. This value will not change unless edited by the User.
This is the most common use. However, if you must, you can set a Basis and
Multiplier for this one item. Just be aware that when the value of the Basis
changes so will the Price. This is true throughout APX. The only non volatile
pricing is at the Item Net level. If you have a considerable amount of Nets
maybe you should look into setting up a Customer Catalog. Customer Catalogs can
work in conjunction with APX. When an Account is tied to both an APX and a
Customer Catalog the Customer Catalog price will override the APX price. If the
item is not in the Customer Catalog it will flow through the APX. If you don’t
believe me confer with our state of the art IT department
Seriously, that’s a younger version of
Gerald.
Still confused? Let’s look at some Scenarios:
All items at Net Cost plus 15%: set Basis
to Net Cost and Factor to 1.1764
All items at Replacement Cost plus 12%: set Basis to Cost and Factor to 1.1364,
Type to Multiplier and Method to All.
Specific Items at a confirmed price, specific
Vendors at Resale plus 10%, and all other Items at Auto Price1. At the Header
level set the Method to Both, Type and Basis are not required in this scenario
since we are defaulting to AutoP1. Set the Factor to 1.0000 and the Default to
Auto Price1. The Item rebate Cost should be set to No. This will take care of
all items not included at the Vendor or Product Code level. Create your Vendor
level items with a ZZZZZZ Price Group, enter a Basis of Resale and a Factor of
1.1111. Now you can enter your specific Net Items, enter the Product Code and a
Net Price. No other values are necessary, these items will be Priced at the
value entered in the Net column.
Specific Vendor/Group at Resale plus 5% all
other groups for this Vendor at Resale plus 7% Net Cost Items at 15% all other
items at Resale Price. At the Header
level set Basis to Resale, Factor to 1.000, Method to Vendor, Type to
Multiplier and Default to Header. This will take care of Items not rebated and
not of specific Vendor. Also at the Header level set Item Rebate Cost to Yes
and IRC Factor to 1.1764. This will handle all Rebated Items at Net Cost. Don’t
forget this will override any other item level pricing, including the group we
are about to setup. Now for the Vendor Group level: enter your IMS Vendor
Number and specific Price Group. Enter a Basis of Resale and a Factor of
1.0526. This specific Vendor Group is now priced. To set all other Groups for
this Vendor at 7% create another Vendor Level entry but this time put ZZZZZZ in
the Group column and a Basis of Resale with a Factor of 1.0753.
As you can see it is very simple once
you have defined your goal. If you come across a scenario where you are not
getting your desired results please let us know and we will respond
accordingly.

I have not covered how items are
rebated even though they can play a big part in your results. We will assume
they have been setup properly but it can be a source of undesired results. As
far as the Default value of Auto Price1 and Auto Price 2, these values are
setup and calculated at the Group Catalog Vendor/Price Group level.
Accounts assigned an Auto Pricing ID
are homogenous throughout all applications (MMS, WEStore, Ariba, HubWoo, etc),
and all Order Entry routines (Price Query, Quotes, Delivery Tickets, Counter
Sales).
How to check margin:
In MMS under the Reports/Miscellaneous
menu there is an Auto Price Audit
report. Run this report against a low and high margin to view possible problems
within the matrix. This Report can be run by Vendor/Group or at a detailed item
level. There is also an Auto Price Catalog report. This will show the net price
based on the APX based on catalog selected. Price ID, for just items setup in the APX, Store Inventory, for all items in the store inventory, or Inventory Catalog for all items in
group inventory. For Customer convenience this report is indexed by inventory
drill down code.
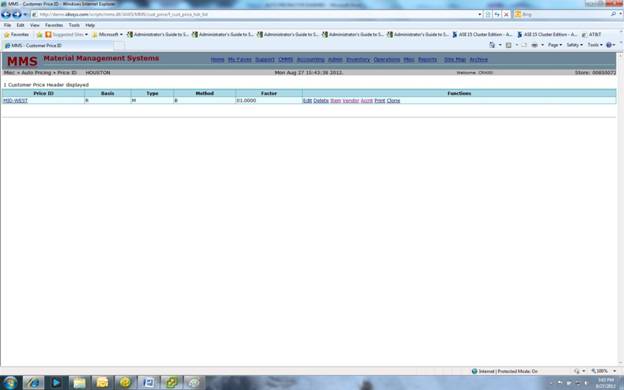
REVIEW:
Pricing
ID Add - Create a New Auto Pricing ID and build pricing
scheme. Formulate a plan and enter APX Header information accordingly. Unlike
the Constitution APX is a living, breathing document it will change whenever
the Basis you chose is updated. Only Nets at the Product Code level are
constant.
Price ID: enter an associative APX
name.
Type:
Discount or Multiplier. Simple mathematical technique to arrive at a solution.
Basis:
Resale – Group Catalog Resale Price. Cost – Store Catalog Replacement Cost, if
not available then Group Catalog Replacement Cost. Trade Cost – Trade Service
Catalog Cost. Trade Resale – Trade Service Catalog Price. Net Cost – DT Item
Cost (could be rebated, replacement, user inputted), whatever is displayed
after Refresh of Quote or Ticket. List – Group Catalog List Price. All values
are dynamic, whatever value exist at time of creating your quote, ticket, or price
query.
Method:
All – all pricing done at the Header Level no Vendor or Netted Items. Vendor –
Specific pricing at the Vendor/Group everything else defaults to the Header
default setting. Items – Specific Net Priced Items everything else defaults to
the Header default setting. Both – combination of Vendor/Group and Net Priced
Items, everything else defaults to the Header default setting.
Default: selection
for all Items outside the matrix. Header – based on Type, Basis, Method, and
Factor at the Header level. Auto Price 1 – Group Catalog Auto Price 1 column,
calculated at the Group Vendor level. Auto Price 2 – Group Catalog Auto Price 2
column, calculated at the Group Vendor level. Resale - Group Catalog Resale
Price.
Factor:
numerical value assigned to calculate desired margin of return.
Item
Rebate Cost: Yes or No. If Yes calculate all rebated items by the
rebated cost. If No, do not.
IRC
Factor: numerical value assigned to calculate desired margin
of return for rebated items. Not valid if Item Rebate Cost = N or space.
Adding
Customer Price Vendor – Create Vendor Groups within the
matrix. If entered overrides header setup, except for Item Rebate Cost of ‘Y’.
Vendor –
valid Group Vendor number (use the search).
Price
Group
– valid Group Catalog Price group associated with a specific Product Code.
Entering a ZZZZZZ in this column will set it as the default for all Price
Groups not entered for the Vendor.
Basis –
overrides the Basis setting at the Header level for this specific Vendor/Group.
Factor -
overrides the Factor setting at the Header level for this specific
Vendor/Group.
Adding
Customer Price Item – Create Net Priced Items by specific
Product Code. When entered at this level it will override any conflicting
Vendor/Group or Header settings, even for Item Rebate Cost of ‘Y’.
Product
Code
- valid Group Product Code (use the search).
Net –
The Price at which you want to sell the item.
Cost
– Not
being used at this time.
Basis
– Overriding
Basis, not used if Net Price entered.
Factor
- Overriding
Factor, not used if Net Price entered.
The
End

Thank
You.